Taken from Designer Digitals e-newsletter:
The vertical distance between the lines of text is called "leading" which is easy to remember once you realize that the word comes from a time when type was set by hand in printing presses. Strips of lead were inserted between the lines of text as spacers, so line spacing has become known as leading.
Increasing the vertical spacing makes your text easier to read and can help you fill in a journaling space when your story doesn't contain many words.
Begin by using the Move tool to drag a journaler onto your scrapbook page. Get the Horizontal Type tool and choose your font name, style, size, and color in the Options Bar. Click on the top left corner of your journaling block and type your text.
When you are finished, highlight the text and move your cursor to the Options Bar across the top of the editing window.
In Photoshop Elements, you can either choose a leading from the leading drop-down menu or position your cursor over the leading icon until it becomes a horizontal arrow. Moving this scrubby slider to the right increases the distance between lines, while moving it to the left decreases the distance between the lines. Watch your text alignment change as you scrub from left to right until it aligns with the lines on the journaler. Click the green checkmark in the Options Bar to confirm the leading.
In Photoshop, choose the Paragraph and Characters palette icon in the Options Bar (or select Window > Character) and view the Character tab. Choose a leading from the leading drop-down menu or use the scrubby slider to adjust the distance between the lines. Click the checkmark in the Options Bar to confirm the leading changes.
Saturday, December 26, 2009


Tuesday, December 22, 2009
Make your own Snowglobe Ornament
 This fun DIY project is from the equally fun Photojoto newsletter. Enjoy!
Step 1: Drink Up!
First, empty out the liquor bottles. Drink as many as you can in the space of five minutes.
Repent. Rethink. Repeat.
When you’re done, peel off the labels, wash the bottles and let them dry inside and out.
Take two aspirin and a nap. Then move on to Step 2.
Step 2: Mixology

In a container that has a spout, mix equal parts of corn syrup and water.

Make enough liquid to fill all the snowglobes you want to make.

Step 3: Sparkle Sparkle!
Fold a piece of paper of scrap paper in half. Pour some glitter* into the the valley of the fold.

Now use the creased paper like a funnel to help you pour glitter into the bottle without spilling it everywhere.
*FYI, you can make realistic-looking “snow” by shredding a white PVC pipe with a cheese grater. Weird, right?

Step 4: Cut ‘Em Down to Size
Crop your photo to that size in Photoshop (or whatever program you’re into these days).
Print the photo and use scissors to cut it out.

Step 5: Seal ‘Em Up
Waterproof the photo by covering it completely with packing tape. Cover both sides and make sure there’s nowhere for water to seep in.

Step 6: Roll ‘Em Up
Roll the photo up small enough to fit into the neck of the bottle. Bending it around a pencil helps.
Insert the rolled-up photo into the bottle. The photo should flatten out on its own, but if it doesn’t, use the end of the pencil to poke it back into shape.
Roll the photo up small enough to fit into the neck of the bottle. Bending it around a pencil helps.
Insert the rolled-up photo into the bottle. The photo should flatten out on its own, but if it doesn’t, use the end of the pencil to poke it back into shape.
Step 7: Fill ‘Er Up

With a steady hand (see why you needed a nap?) pour the liquid carefully into the bottle.
Fill it up to the top, then put the cap back on the bottle.

Step 8: Tie It Off
Cut a 5-6″ length of colored string, and tie a knot around the neck of the bottle. Then tie a larger loop so you can hang your ornament on the tree.
Cut a 5-6″ length of colored string, and tie a knot around the neck of the bottle. Then tie a larger loop so you can hang your ornament on the tree.

Step 9: Hang ‘Em High
That’s about it! Go hang your fabulicious new ornament on your Festivity Object of choice, be it Kwanzaa tree, Christmas shrub or Festivus pole. Happy holidays!
That’s about it! Go hang your fabulicious new ornament on your Festivity Object of choice, be it Kwanzaa tree, Christmas shrub or Festivus pole. Happy holidays!
Monday, December 14, 2009
Gift Certificates
* Gift Certificates - Though publishing deadlines may be passed or coming soon, giving a Heritage Makers Gift Certificate allows for ultimate creativity for the recipient to preserve and share their photos and stories however they wish in the product that is given. Contact me or visit my web site for this season's specials & new products. http://www.MakeYourMomentsLast.com
Thursday, November 12, 2009
Fun Reunion (or whenever) project!

BLOCKS: Create your blocks to say whatever you want... does your reunion have a theme? If so make a block per family or per kid with the theme or family moto. 1 12x12 page will make 5 blocks, then cut a 2x4 into 7 in blocks.
Sunday, November 1, 2009
Family Clock Project


FAMILY CLOCK: Super easy and a great addition to your home. This is made using 1 Heritage Makers 8x8 page and a 9 inch clock.
Thursday, October 29, 2009
How to Photograph a Ghost — A Spooky Photographic Trick (That’s Quite a Treat)!
A fun & timely tip from the folks at Photojoto ...
(This idea came from reader Julliette)
This tutorial is not for the faint of heart.
We’re about to tell you how to photograph a ghost and it’s going to be terrifying(ly simple).
In just three little steps you can have a photo of a real live ghost that looks a lot like one of your real live friends.
A photo so spooky it’ll send you running for mommy (to get her to pose for more ghosty photos).
Step One: Take your best shot (and then take it again)!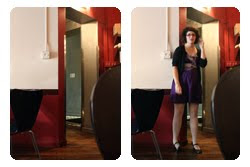
This is the big secret right here.
Don’t tell anyone, but you’re going to need to take two photos of almost the exact same thing.
You need one photo of your friend (soon to be ghost) and a photo of the exact same thing, minus the friend.
The easiest way to achieve this is to put your camera on some kind of tripod, or set it on a table, or on the ground. Anywhere stable really (i.e. not your hot little hands).
Now that your camera is stable, take a photo. Done.
Make sure everything in the shot stays consistent. No cars driving by in the background, no wind blowing the trees every which way, no gophers poking’ their darling little heads up out of the ground…
Now, put your buddy in front of the lens and take a second shot.
Step Two: Layering (easy as cake)
So, once you’ve got the two photos into your compy, it’s time to layer away.
You want to get the photo with your friend layered on top of the photo that is friend-free.
You can use Photoshop or Gimp or any program that lets you work with layers.
The process is pretty simple: Open photo number one (no friend). Open photo two (hello friend!). Select-all of photo two and copy. Now click back on over to photo one and paste.
Shazam. Magic. A new layer is born.

Step Three: Hold on to your hat
It’s about to get spooky. Just adjust the opacity of the top layer to somewhere around the 50% mark.
In Photoshop and Gimp, the opacity slider is right on the layers palette. (You can see it up there in the photo for step two).
Everything that is in both layers will look just the same. Your friend will fade… What you’re left with is one friendly ghost!
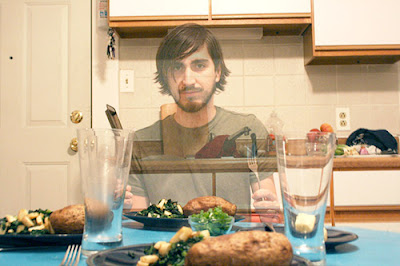
Step Three.2: Bonus!
Turn your pal into a headless horseman!!! No head! Probably, no horse either (unless you have access to a ranch).
Follow steps one and two and then… Bust out that eraser tool.
Simply erase away your friend’s head. No head!
(This idea came from reader Julliette)
This tutorial is not for the faint of heart.
We’re about to tell you how to photograph a ghost and it’s going to be terrifying(ly simple).
In just three little steps you can have a photo of a real live ghost that looks a lot like one of your real live friends.
A photo so spooky it’ll send you running for mommy (to get her to pose for more ghosty photos).
Step One: Take your best shot (and then take it again)!

This is the big secret right here.
Don’t tell anyone, but you’re going to need to take two photos of almost the exact same thing.
You need one photo of your friend (soon to be ghost) and a photo of the exact same thing, minus the friend.
The easiest way to achieve this is to put your camera on some kind of tripod, or set it on a table, or on the ground. Anywhere stable really (i.e. not your hot little hands).
Now that your camera is stable, take a photo. Done.
Make sure everything in the shot stays consistent. No cars driving by in the background, no wind blowing the trees every which way, no gophers poking’ their darling little heads up out of the ground…
Now, put your buddy in front of the lens and take a second shot.
Step Two: Layering (easy as cake)

So, once you’ve got the two photos into your compy, it’s time to layer away.
You want to get the photo with your friend layered on top of the photo that is friend-free.
You can use Photoshop or Gimp or any program that lets you work with layers.
The process is pretty simple: Open photo number one (no friend). Open photo two (hello friend!). Select-all of photo two and copy. Now click back on over to photo one and paste.
Shazam. Magic. A new layer is born.

Step Three: Hold on to your hat
It’s about to get spooky. Just adjust the opacity of the top layer to somewhere around the 50% mark.
In Photoshop and Gimp, the opacity slider is right on the layers palette. (You can see it up there in the photo for step two).
Everything that is in both layers will look just the same. Your friend will fade… What you’re left with is one friendly ghost!
Step Three.2: Bonus!
Turn your pal into a headless horseman!!! No head! Probably, no horse either (unless you have access to a ranch).
Follow steps one and two and then… Bust out that eraser tool.
Simply erase away your friend’s head. No head!
Monday, October 26, 2009
Memory Box Project

SPECIAL MEMORIES BOX: This is a great way to keep all your favorite cards, notes, letters, etc. all in one place. This is made using 2 Heritage Makers 12x12 pages and a 7in craft box (available at craft stores).
Sunday, October 25, 2009
Scrap by Color


Here's another cool gadget that helps you plan the colors to use in your layouts by extacting them from the photos you'll actually be working with. This one is from Scrapbook.com & works like the Color Palette Generator I blogged about in an earlier post. Give it a try & see if it sparks your creativity!
Saturday, October 24, 2009
HGTV Halloween Photo Contest

HGTV is hosting a halloween photo contest that sounds like fun. Here's the link if you'd like to try your luck!
Saturday, October 17, 2009
How to scroll up and down your brush list
The Brush Off, How to scroll up and down your brush list - Another tip from the Designer Digitals Newsletter
Are you brushing up on your brush skills? Here are a couple of tips I've incorporated into my brush workflow that help increase my productivity.
1. Always create your brushwork on a new transparent layer. Click the Create a New Transparent Layer icon in the Layers palette before using a brush. Doing this allows you to delete the brushwork if you later decide you do not want it on your project. And it allows you to change the blending mode or color of the brushwork easily.
2. When you are working with a brush set, you can scroll through all of the loaded brushes using the arrow keys on your keyboard. Just select the Brush tool and hover the cursor over your open document to see the outline of the brush. Use the right arrow key to scroll through the rest of the set. Your cursor will take on the shape of the brushes as you scroll, allowing you to find just the right brush for your project. Use the left arrow key to scroll back through the brushes in the set. Click once on your document to apply the brush to your new transparent layer.
Are you brushing up on your brush skills? Here are a couple of tips I've incorporated into my brush workflow that help increase my productivity.
1. Always create your brushwork on a new transparent layer. Click the Create a New Transparent Layer icon in the Layers palette before using a brush. Doing this allows you to delete the brushwork if you later decide you do not want it on your project. And it allows you to change the blending mode or color of the brushwork easily.
2. When you are working with a brush set, you can scroll through all of the loaded brushes using the arrow keys on your keyboard. Just select the Brush tool and hover the cursor over your open document to see the outline of the brush. Use the right arrow key to scroll through the rest of the set. Your cursor will take on the shape of the brushes as you scroll, allowing you to find just the right brush for your project. Use the left arrow key to scroll back through the brushes in the set. Click once on your document to apply the brush to your new transparent layer.
Saturday, October 10, 2009
Thursday, October 8, 2009
Off-the-Wall Guide for Fantastic Framing
I got this fun idea from my Photojoto newsletter ... I think I'll give it a try!
Our Off-the-Wall Guide for Fantastic Framing
(via reader Michael Galpert)
Find a frame

Any frame will do for this project. We found tons of great options at our local thrift store. And you can always look around online, where options abound. You want it to be small enough to fit in the shot if you hold it out at arms length in front of your camera, and big enough to fit a friend’s face. We found a typical friend’s face to fit nicely in an 8×10 frame.
(via reader Michael Galpert)
Find a frame


Any frame will do for this project. We found tons of great options at our local thrift store. And you can always look around online, where options abound. You want it to be small enough to fit in the shot if you hold it out at arms length in front of your camera, and big enough to fit a friend’s face. We found a typical friend’s face to fit nicely in an 8×10 frame.

Take it out on the town

Simply hold the frame out in front of your camera or have a passing stranger hold the frame up for you. A friendly grin and a polite “please,” will convince just about anyone to hold up a frame for a minute. Not sure who to ask? We’ve found that a person with a camera around their neck is usually more than willing to do a favor for a fellow photographer.
Frame your Friends


Once your arm gets tired from holding your frame out in front of the camera, pass the frame around to friends and neighbors and let them do the heavy lifting. They can frame themselves, frame each other, frame the dog. Play a quick game of how-many-friendly-faces-fit-in-one-frame?
Think outside the box

Box, Frame, same idea. Some people will assume that if they’re not behind the frame, their not in your shot. The area outside of the frame can be even more interesting than what’s in it. Catch your friends’ true reactions to your photographic antics.


Box, Frame, same idea. Some people will assume that if they’re not behind the frame, their not in your shot. The area outside of the frame can be even more interesting than what’s in it. Catch your friends’ true reactions to your photographic antics.
Technical Tips:


FlashIf you’re shooting a bright scene, but you’re standing in the shade, use the flash to brighten up the frame.
Focus CarefullyMake sure to focus on your subject before you hold the frame in the shot. If you’re using auto focus your lens might focus on the frame and not the intended subject.
Fall Photography Tips
Ready to take great Fall photos? Here are some tips from Scrapbook trends newsletter.
1. Set your camera to landscape mode. If the automatic flash triggers, it will wash out all the beautiful color. Set your camera on a tripod if the shutter speed needs to be lower.
2. Morning or evening will provide the best possible light, especially if there are people in your photo. Bright daylight tends to cast heavy shadows across faces. Overcast days are also great!
3. Use the colors as a background – use a tangled old tree, a wooden fence or wandering stream as your main subject and let the fall colors be a beautiful backdrop.
4. Get close to the leaves – instead of trying to capture the entire landscape, find one vibrantly colored tree and photograph the leaves up close.
5. If you're taking family pictures in the fall leaves, dress for the occasion. Warm scarves and knitted hats give the impression of a crisp autumn day. Choose warm neutrals (creams, browns and tans) so that clothing doesn't compete with the vibrant background.
1. Set your camera to landscape mode. If the automatic flash triggers, it will wash out all the beautiful color. Set your camera on a tripod if the shutter speed needs to be lower.
2. Morning or evening will provide the best possible light, especially if there are people in your photo. Bright daylight tends to cast heavy shadows across faces. Overcast days are also great!
3. Use the colors as a background – use a tangled old tree, a wooden fence or wandering stream as your main subject and let the fall colors be a beautiful backdrop.
4. Get close to the leaves – instead of trying to capture the entire landscape, find one vibrantly colored tree and photograph the leaves up close.
5. If you're taking family pictures in the fall leaves, dress for the occasion. Warm scarves and knitted hats give the impression of a crisp autumn day. Choose warm neutrals (creams, browns and tans) so that clothing doesn't compete with the vibrant background.
Subscribe to:
Posts (Atom)