When you are working on a digital project in Photoshop and Photoshop Elements, going "home" means reaching the top left corner of your open document. To get there quickly when you are working, press the Home key on your keyboard. The software will reposition the page in the editing window so that you are viewing the top left corner of the document.
Similarly, Photoshop and PSE consider the bottom, right corner the "end" of the document. Pressing the End key on your keyboard will reposition the document so that you are editing the bottom, right corner.
Using these shortcuts will help you quickly navigate to key points on your document.
Wednesday, September 30, 2009
Tuesday, September 8, 2009
“X” Marks the Spot – Finding Backyard Photo Treasures
I found this interesting & thought I'd share ... it's from DigitalPhotographySchool.com
In this post Bobby R. Strange shares some tips on finding photographic gems in your own backyard.
So how do we find these treasures? Here are a few tips that helped me when I first started exploring my yard…
3. Try to see your yard through a child’s eyes. Kids don’t analyze why they want to build that sand castle. They just do it because it’s fun and interesting to them.

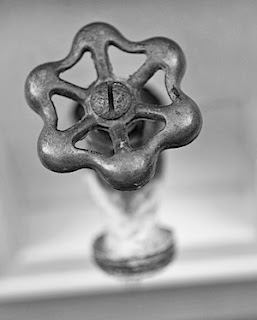
4. Think small. Little things like a rusty door hinge, a lady bug on a leaf, or even an outdoor water faucet can make wonderful images. And all three of these things can be found outside most houses.
5. When you find your “X”, shoot it from different angles. Walk all the way around it if you can and see it from all sides. One subject can sometimes give you more than one great image.
6. And if you live in a city and don’t have any kind of yard? Go to the park. Most cities have at least a small park located near residential areas.
See, you don’t need an eye patch or a parrot on your shoulder in order to find those photo treasures (although they may make the hunt more fun!). All you really need is a willingness to stop and take a look around at the things you overlook every day. There are many little treasure maps to explore right outside your door. In fact, I recently “set sail” on my own backyard photo treasure hunting expedition and discovered the “treasures” you see below. So grab your camera, throw on your pirates cap (optional), and embark on your next great adventure…in your own backyard.
This post was contributed by Bobby R. Strange - see more of their work at their gallery here.
In this post Bobby R. Strange shares some tips on finding photographic gems in your own backyard.

We’ve all heard stories of grand treasures being found by following the “X” on the treasure map, but how far do we have to travel from the comfort of our homes to uncover the treasure that is a wonderful photo opportunity? 100 miles? 1000 miles? Try 50 feet! I know what you’re thinking…50 feet from where my favorite slippers are isn’t exactly an exotic locale. But it can be just as rewarding! There are many photo “treasures” to be found in our own backyards if we just take the time to explore them. I think many times it’s just a matter of not seeing the trees for the forest (yes, you heard me right). We walk outside and take in the whole scene without seeing what makes up our own little part of the world. Other times it may be that we just don’t think there are little hidden gems right outside our bedroom windows.
So how do we find these treasures? Here are a few tips that helped me when I first started exploring my yard…
1. Probably the biggest tip that’s helped me is to just stop and take a look around. “Smell the roses”, so to speak. Just because you’ve been outside doesn’t mean you’ve noticed everything that’s there. Which brings us to tip #2…
2. Pick a spot in your yard and look at everything within arms reach. Find something interesting? That’s your “X”…take a picture of it! You’ll be amazed at what you start to see if you just pick a spot and look around that one area.
2. Pick a spot in your yard and look at everything within arms reach. Find something interesting? That’s your “X”…take a picture of it! You’ll be amazed at what you start to see if you just pick a spot and look around that one area.
3. Try to see your yard through a child’s eyes. Kids don’t analyze why they want to build that sand castle. They just do it because it’s fun and interesting to them.

4. Think small. Little things like a rusty door hinge, a lady bug on a leaf, or even an outdoor water faucet can make wonderful images. And all three of these things can be found outside most houses.
5. When you find your “X”, shoot it from different angles. Walk all the way around it if you can and see it from all sides. One subject can sometimes give you more than one great image.
6. And if you live in a city and don’t have any kind of yard? Go to the park. Most cities have at least a small park located near residential areas.
See, you don’t need an eye patch or a parrot on your shoulder in order to find those photo treasures (although they may make the hunt more fun!). All you really need is a willingness to stop and take a look around at the things you overlook every day. There are many little treasure maps to explore right outside your door. In fact, I recently “set sail” on my own backyard photo treasure hunting expedition and discovered the “treasures” you see below. So grab your camera, throw on your pirates cap (optional), and embark on your next great adventure…in your own backyard.
This post was contributed by Bobby R. Strange - see more of their work at their gallery here.
Monday, September 7, 2009
Moving Layers tip from Designer Digitals
Adobe Photoshop or Elements Tip of the Week:
Photoshop Ups and Downs: How to Move Layers in the Layers Palette
You can also watch this tip on video on our blog: Digital Scrapbooking Tips and Tricks: Shortcuts to Move Layers [Video]
On a recent outing to an amusement park, I rode the beautiful, old-fashioned carousel with my son. After a few rounds I found myself asking what was so appealing about the repetitive up and down, round and round motion. Thankfully the ride ended before I turned green. And fortunately, there are shortcuts for moving layers up and down in Photoshop and Photoshop Elements that are quick and easy!
When you move a new image onto your Photoshop or Photoshop Elements project, the software places it one layer above the selected layer. Sometimes this hides the new image behind existing layers.
You can move the new layer up in the hierarchy several ways:
Click and drag the layer up in the Layers Palette
Press the Ctrl + Right Bracket ] key (Mac: Cmd + ] key) to move the layer up one position. Repeat the keystrokes until the layer is in place.
Press Shift + Ctrl + Right Bracket ] key (Mac: Shift + Cmd + ] ) to move the layer to the top of your project.
To move the layer downward in the hierarchy, use the opposite commands
Click and drag the layer down in the Layers Palette
Press the Ctrl + Left Bracket [ key (Mac: Cmd + [ key) to move the layer down one position. Repeat the keystrokes until the layer is in place.
Press Shift + Ctrl + Left Bracket [ key (Mac: Shift + Cmd + [ ) to move the layer to the bottom of your project.
Saturday, September 5, 2009
Creative Cropping - from Digital Scrapbook Place September Newsletter
Digi-Scrapper Inspiration by Meg
Creative Photo Cropping
Cropping is one of the most elemental and useful photo processing choices. It can serve many purposes: resizing a photo to fit a page, removing distracting elements or backgrounds from a photo, creating a new focal point, etc. In scrapbooking, there are many design elements that need to work together to create an artful, balanced page. How you choose to crop your photo can help it stand out amongst all the other elements. Take a look at the difference between the original and cropped version of this photo:
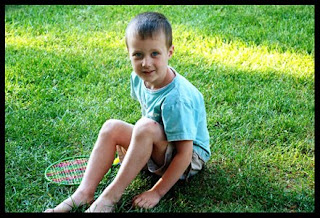
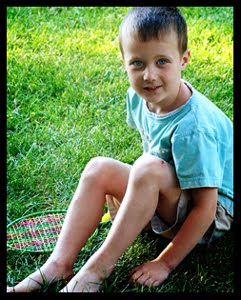
This was a simple snapshot, one of many that were very similar. Notice how simply cropping in the edges (and changing the photo's orientation from horizontal to vertical) brings the focal point in to the face and takes the photo from a snapshot to a portrait.
Cropping can also add interest, energy, and mood to a photo. That impression will transfer to the entire layout. Don't be afraid to dissect bodies and buildings! Cropping in extra tight or at unusual angles will bring the viewers' eyes to a focal point they might have otherwise overlooked.
The photo in the above layout is from my daughter's first day of school last year. Do I have pictures of her that show her smiling face? Sure I do! And those are the ones that were sent to all the grandparents. But for me, and this layout for our family album, I wanted to show her personality. Her clasped hands display some of the nervousness she was feeling that day. And the crooked knee socks, well, those were just too cute, I had to highlight them! Remember: emotion and attitude are conveyed through all body parts, not just the face. In fact, we're all so used to "smiling for the camera", that sometimes the facial expression is not what your subject is truly feeling. Be sure to look for the body language that reveals more information.
Check out the photos on the following layouts and be sure to try creative cropping with your own photos. It's a simple tool that can add a huge punch of interest!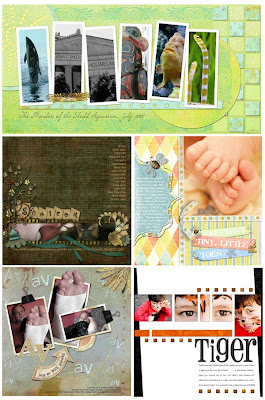
Friday, September 4, 2009
The Fabulous Fade - from the Digital Scrapbook Place September Newsletter
Digi-Scrapper Inspiration by Mandy
The Fabulous Fade.
Using a gradient mask to create a fast eye-catching graphic layout.
One simple yet effective tool in our digitalscrapbooking arsenal is the gradient mask. An easy starting point to try out a gradient mask is with a single photo faded into a background.
I created my layouts in both Photoshop (CS3) and Corel Paint Shop Pro X (the programs I use on my computer) but I am sure you will find gradient masks or the equivalent in the package you use.
Open your layout, position your background paper and add your photo layer. From your Layers Palette/Menu, add a layer mask.
Remember: masks work with BLACK and WHITE. Black will hide areas under the mask, and white will reveal. Shades of gray will give you the various levels of opacity in between.
In Corel Paint Shop Pro select the Flood Fill Tool (the bucket) and from the Materials choose the Gradient option. Click on the Gradient image to define its properties. Choose Linear, from the pull down options the black to white gradient, and angle it at 0 degrees. Click on your layout to Flood fill your Gradient Mask.
If your mask is too big to be effective – you can select the mask and move it or resize it. I chose to squash mine down, until I liked the effect of the water fading into the paper. I added my title and dropped that behind the gradient mask to fade it into the background with the photo.
In Photoshop, choose Gradient (hidden under the Paint Bucket tool) and from the gradient menu options select a linear gradient that goes from black to white, or black to transparent. On your layout, click on the mask to ensure it is selected, then click and drag the mouse in the direction of the fade.

Note: Hold down the Shift key while dragging the mouse to get a straight gradient.

Note: Hold down the Shift key while dragging the mouse to get a straight gradient.
Ensure that the gradient starts and ends in a place where the edge of the photograph is not visible through the gradient. It may take a couple of attempts to get the mask the way you envisaged it. If the edge of the photo is visible, you are taking you gradient too far, keep the end point within the edges of the photograph.
Both layouts were framed with edge overlays while added elements move the layout away from a pure graphic design to a fun, mixed styled layout. Next time you want something fast and fabulous… FADE!!!
Subscribe to:
Posts (Atom)